HOW-TO

Check out this article in the print edition of StudentFilmmakers Magazine, February 2008. Click here to get a copy and to subscribe >>

Back Edition Spotlight: February 2008, StudentFilmmakers MagazineDifferent Forms of Layoff for Stages of Editing
From the Earliest Stages to that Final Output

by Daniel Gaucher

Page 1 | 2 | 3

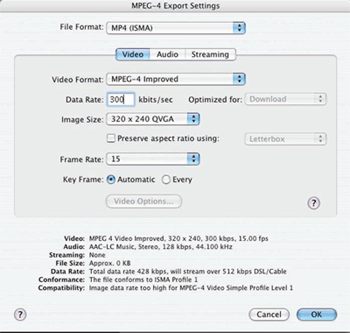
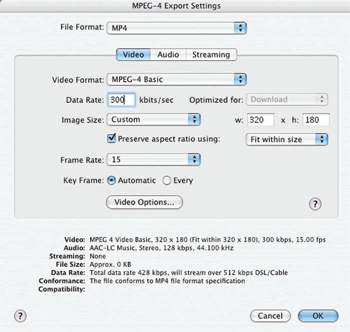
... Continued

1. Compressed QuickTime Movie: This is usually used during a rough cut to fine cut stage. It is low quality, easy to transfer via email, microdrive or FTP, and only illustrative of the pacing of the edit, not of the picture quality. The most common method of output is to set in and out points on your timeline (either a section or the entire piece if completed), render all, and go to File/Export. Save as an MPEG4 (improved), for wide compatibility, with 320x240 scaling at 300kps. Set for 15fps with deinterlacing (or �single field�) on if possible. If you are in widescreen you may need switch to regular MPEG4 to adjust to 320x180 with preserve ratio on. These settings have worked for me before, but technology and compatibility are always improving, so research blogs or experiment for settings that suit you best. Your file size should be about 3MB/minute of edited video. It is now common when I work for History Channel or Discovery to send cuts-in-progress this way for review via FTP.

2. MPEG2 for DVD: This stage is often used for a fine cut approval, where picture quality is of importance, especially if graphics have been placed. Most NLE�s come with this output setting as a menu option under File/Export. You will either make a QuickTime �shell� for your output, similar to a reference movie where the DVD authoring program will still need to encode the actual media files, or you may actually output an MPEG2 file directly, the format needed to play on consumer DVD players. Either way, you will need an authoring program to create menus and burn a playable DVD. This format begins to reflect good picture quality, but remember� It is still a compressed format and is not acceptable as a master layoff.

Stages in Editing

3. Uncompressed QuickTime Movie: This setting shows up under �File/Export/Send to QT Movie� (AVID) or �File/Export/QuickTime Movie� in Final Cut. The idea here is to get an uncompressed movie, also called same-as-source, into a stand-alone file, which can then be re-imported into a NLE or graphics program with no loss of quality. It also serves as a digital archive file. The only problem� File size is quite large and will require it to be stored on a hard drive. This item is usually included in the dreaded �deliverables� and is expected by the client.

Stages in Editing

4. Layoff to Tape: In this brave new world of HD and variable frame rates, layoff to tape has become much more complicated than ever before. Basically there are three questions you need to ask yourself. First, is this 720 or 1080 HD? Secondly, is this interlace or progressive? Finally, is this 23.98, 29.97 or 59.94 frames per second? These questions should properly have come up before you digitized any material. At this point, however, you have to make sure you know what format you need to master in. Case in point, on my last job we were going to master in 720p at 23.98fps. This required a Panasonic DVCPRO HD deck, which we rented. At the last minute the client decided that a 1080p layoff would be better, so the Panasonic deck went back and was switched out for a Sony HDCAM SR deck. We then had to make adjustments to both the output of the video card and the editing program. We discovered one timeline had been improperly created at a 59.94fps rate, forcing us to rerender the entire timeline to make it compatible also. In the end, footage from different sources, incompatible frame rates, and different resolutions all combined to eat up an entire day of online as we corrected our own mistakes to make the final output work.

Continued on Next Page...

Page 1 | 2 | 3