by Saro Varjabedian
A DP’s main function is to coordinate all the elements necessary to capture an image that aesthetically supports the story. These elements include location/set design, blocking, lighting, camera placement, crew and time. Each element offers numerous variables making the coordination of them during the shoot that much more difficult. Therefore, to effectively coordinate all of these elements during the production process it is crucial to plan out the variables for each element during pre-production. One method is to create a map that defines and communicates all of the variables for each element. This map will not only serve as the shooting blueprint to your production but it will define the final image.
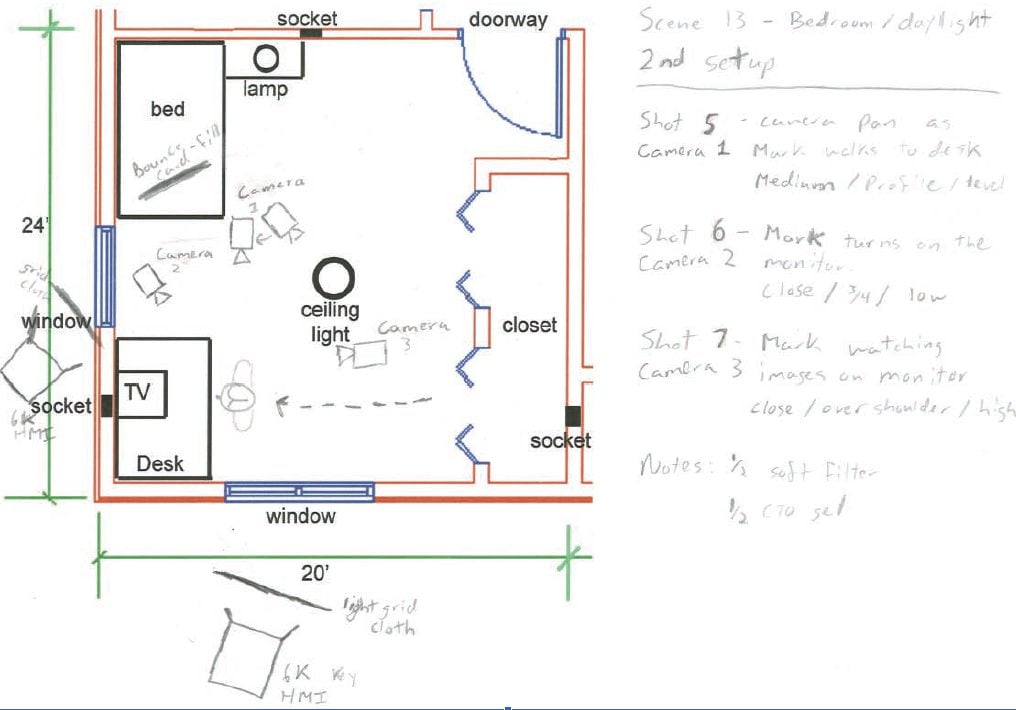
In pre-production the DP’s first step is to work with the Director and Art Director to narrow down all the locations or sets that will be used during the shoot. Once all the locations/sets are determined, begin to draw a map of the location much like the blueprints an architect would use. Make sure to include all the information that will be needed for the planning process like space/dimensions, natural light sources and electrical sources. It is helpful to know the confines of the space and the natural light available because it will help in the preparation of the equipment needs. For instance, by taking note the time of day and the way sunlight falls into a room you can decide whether it is more practical to use the natural light source from sunlight or to replicate it with HMIs. Often it is more desirable to shoot night for day because it offers the most control over lighting. Also note the amount electricity available per circuit. A typical household circuit is limited to 20 amps, which in practice is about 2000 watts. This will mean that a generator will be needed to run any lights bigger than a 2k.
At this point defining the action/blocking with the Director will define your camera placement. Begin by referring to the script or story board and go through the blocking of the action for each scene with the Director. The camera placement and the area or space captured in the image will dictate where and how lighting should be set up. Start grouping all the shots or camera placements that will be facing in the same direction and that have the same lighting configuration. Create a separate blueprint for each group of shots that have the same lighting configuration and label the blueprint setup 1, 2, 3, etc. It is easier just to make copies of the original blueprint and then write in the information. Correlate the shot with the camera placement and document the cameras height, distance and angles in relationship to the action.
Now start designing the layout of your lights for each blueprint setup. At this point of pre-production lighting tests should occur. Once an acceptable lighting configuration has been achieved add that information to each blueprint setup. You can add other important notes like flags, gels, filters and types of lights that will be used during the shoot. By going through the lighting tests with the crew during pre-production, they will be able to remember each setup much faster and easier when they refer to the blueprint during production. Also use a pencil so changes can be made to the blueprint. Expect that during pre-production and up until the last moment before shooting, changes to the scene will be made causing a need to adjust blocking, camera placement and lighting.
The shooting blueprint serves as one way to help facilitate the planning process. It will ensure that almost all conceivable variables will be taken into account. Plus, once the blueprint is done it can be distributed amongst all the key crewmembers so that everyone can refer to it during production. It will act as a guide, communicating each configuration to the crew speeding up the setting up process. It also acts as a method of organizing the sequence of the shooting schedule ensuring that all the shots with the same lighting setup are taken together, economizing time and energy. Going through the trouble of creating shooting blueprints for each setup in every scene seems like a time consuming, tedious process. But remember that the objective of the DP is to coordinate all the visual elements that create an image during production. And after all, the biggest elemental hurdle to overcome during production is time. By spending the time during pre-production to plan as much of the shoot as possible, that time spent will be paid back in dividends during production. The creativity used to design the shooting blueprint will be translated back onto the final image.