
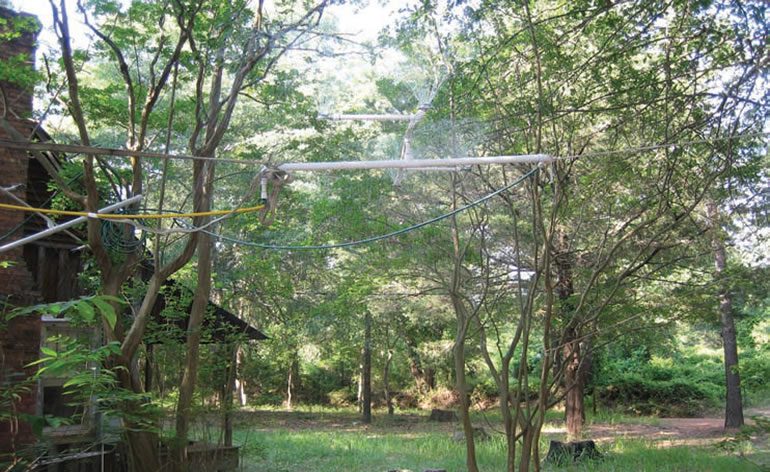
Reference: StudentFilmmakers Magazine, August 2007. How to Build a Rain Maker: Includes Tips for a Successful Downpour by Keith Dearing. Pages 40 & 41.
Whether working under constraints and with limited resources, or you just like to build things for your production company, this is a project that is sure to add to your shots.
The Design:
Taking a look at the Rain Maker’s design, on the underside we have a small storage tank that is built in such a way that when “Action!” is called, the rain will start just a few seconds after the water has been turned on. On top, we have small yard sprinklers attached to outriggers that attach to the top of the small storage tank. This system will work on relatively low water pressure. Of course, the better the pressure, the nicer the effect will be. Your first mission is to head to your local hardware store and pick up a few parts.
The Parts List:
All of the PVC pipe and fittings should be schedule 40. If you have trouble, ask for some help from someone who works in the plumbing department.
• 5 feet of 1 ½ PVC, cut in half
• 10 feet of ¾ PVC, cut this into the list below:
• 2 @ two foot, 3 @ six inches, and 4 @ 10 inches.
• One 1 ½ ‘T’
• Two 1 ½ by ¾ bushings
• One 1 ½ by ¾ female treaded bushing
• Seven ¾ male adapter
• Three ¾ “T’s”
• One ¾ threaded cap
• PVC Solvent glue
• Four yard sprinklers. For this, I used 24’X24’ square pattern sprinklers.
(You may find something different that still works as well as these.)
• Female hose repair end.
The Building Steps:
First, take the five-foot piece of 1 ½ PVC, and cut it in half.
Glue the 1 ½ ‘T’ in between these two pieces.
Next, add one of the 1 ½ by ¾ bushings to one end, and then, glue the other 1 ½ by ¾ bushing to the other end.
At the top of the 1 ½ “ ‘T,’ glue in the 1 ½ by ¾ female treaded bushing.
Now cut three pieces off of the ten-foot ¾ PVC at 6 inches each.
Glue one ¾ male adapter to each piece.
This will give you three identical parts.
Take two of them, and glue them into the 1 ½ by ¾ bushings on each end.
Take the third piece and glue a ¾ ‘T’ to it.
Now take the two ¾ by two-foot pieces of PVC, and glue one to each side of the ¾ ‘T’. Here, you need to be careful with the position that the next few piece are glued up. Take the last two ¾ ‘T’s,’ and glue them 90 degrees opposite to the ‘T’ that is glued into the ¾ male adapter.
Take the last four pieces of ¾ PVC, and glue them into the ‘T’s.’ Add the last four ¾ male adapters to the ends, and let the whole thing set up for a couple of hours.
After the glue is set up, you can take the sprinklers and tread them on to the ends of the top apparatus. Make sure that when you do this the sprinklers point up and away from the holding tank. Then take the top apparatus and treaded it on to the tank.
This rain maker will cover an area of about 30’ by 30’, but if you need more coverage, build a couple of Rain Makers and “daisy chain” them together to get more coverage.
If you only plan to use one Rain Maker at a time, take a ¾ treaded cap, tread it onto one end of the tank, and thread your water hose to the other end.
One modification will be needed for the water hose. You will need to cut off the male end and add a female end to it. This will give you a water hose that has two female ends.
Tips for a Successful Downpour:
Remember, when you are threading the pieces together, there is no need to over tighten them. The worst thing that can happen is it leaks a little. Well, we are making rain here, so that is not going to be a problem!
When you rig the Rain Maker up, try and rig the hose just a little higher than the holding tank. This keeps the water there and not running back out of the tank.
When rigging the Rain Maker, keep in mind the top apparatus will want to lean one way or the other when it fills with water. We took construction twine and tied the ends up so we had a nice level working product.
When not in use or when transporting the Rain Maker, take the top apparatus off of the tank. This makes it easier to move and store.
And last but not least, TEST IT. Make sure that the tank is pre-filled before the director calls action. You really don’t want everyone standing around waiting for the water to start falling.
Have fun with this one ~ I did!
Ilustrations by Michael Dearing. Photo by Justin Kennedy. Keith Dearing has been involved with
independent filming for the past four years. He was pulled in on a short called, Those Sneaky Devils, handed a boom pole and was hooked. Since then, he has become a member of the Indie Club in Dallas, worked on several short films, one feature film and participated as Captain in the 2006 24 Hour Film Race taking 3rd place in their category.