By Brian Flees
Choosing Materials for a DIY Camera Mount
The key to getting the best action shot for your film is creativity. Materials can be found at most hardware stores for use as a camera support. When looking for materials, consider what tools you have available to work with. Electrical conduit, an affordable metal tubing, can work great but requires a metal saw to cut. An easy solution is a tubing cutter but can leave a sharp edge on the inside. Be sure and buy one rated for steel if you do. To take advantage of tools you may already have, look for 1 x 2 and 2 x 2 inch wood strips. They are easy to cut with a hand saw and can be connected with ordinary screws. It’s not so much what you use as it is how you use it that determines if the shot is a success or not.
Planning the POV Shot
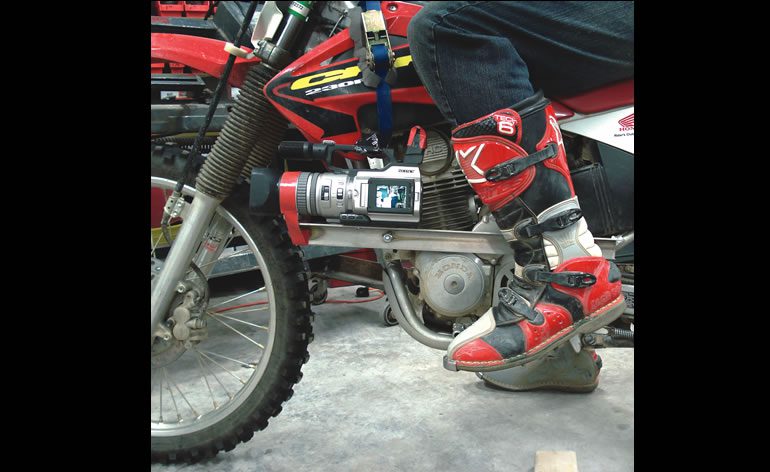
While shooting a project for a client that involved dirt bikes, it was decided that a POV shot would give their audience a feeling of speed. The question was how to mount a DV camera to a dirt bike in a limited amount of time. The first step was to decide where on the bike to mount the camera. The reason for the shot was to make the audience feel like the rider, so a POV shot seemed like the best answer. The client also wanted to make sure the bike looked fast. Because the bike wasn’t going to get much faster than 60mph, we suggested mounting the camera lower to the ground to accentuate the speed. They liked the idea and the next step was to work out the details of mounting the camera to the bike.
Working Around a Motorcycle’s Moving Parts
When attaching materials to a motorcycle, it is important to consider all of the moving parts. When mounting to the front end of a bike, you are limited to areas around the frame and gas tank. The front forks on a bike are moved constantly for balance which can easily upset an audience. For this reason they should be avoided. Also be sure and turn the front tire fully in both directions to check for potential clearance issues. If you want a rear facing shot, you are limited to the rear seat and fairing in most cases as the rear tire and swing arm move in relation to the bike. This is also a consideration when attaching beneath the seat as the tire can come close to or make contact with the mount if it is too low. One trick to check clearance on a street bike with no dust boots on the shock is to place a zip tie around the inner shock tube. Send the rider out to make his run through the scene and check to see how far it was pushed up by the shock. This will show you how far up the front tire will travel in the scene.
Free for members
Sign up free to keep reading
It’s free and takes less than 30 seconds. You’ll also get our Interstellar issue free, and a community of filmmakers sharing their work.
No credit card. Continue with Google or your email.