By Mark Cheng
How did a self-financed 30-minute sci-fi film look like a blockbuster? Mark Cheng breaks down the visual effects, sets and props behind his indie short.
Willie snaps her head to the left just in time to see one of her fellow soldiers crash down onto a pile of boxes. She manages to hear his spine snap amongst the chatter of machine gun fire and the electronic wale of the mech. She switches to full auto and opens up a 4 foot long burst of flame from her rifle as she backs away. Overhead she hears the hum of two MultiBodies as they scream forward to create their own line of suppressing fire. Willie knows that the MB’s are each armed with full reservoirs of 6mm caseless armament, but will they be enough to stop that thing?
An excerpt from the next $200 million summer blockbuster? Not exactly. It’s the final climatic showdown in my self-financed, 30-minute science fiction film, Deployment Strategy, a story that is set 50 years in the future where high-tech commando units arrest rogue programmers and battle mechanical combat androids. We’re in the final stages of post production where the soundtrack, the audio mix, and the special effects are all being worked on in parallel. In this month’s article, I want to share with you how things are going in the effects realm and discuss how things are being put together.
When planning Deployment Strategy’s production, I divided the effects into three categories: practical effects, 2D digital effects, and 3D digital effects. Practical effects are those done in-camera and on-set during the shoot. These effects consisted mainly of blood, guts, and smoke. In the film, appendages are torn off, skulls are crushed, and robots burn. The digital effects I sub-divided into 2D and 3D work because the skill sets are different. I, for example, can hold my own with 2D effects, but need to outsource the 3D design and animation. When all is done, most of the effects in Deployment Strategy will have been accomplished with elements from at least 2 of the 3 categories.
Head Shot
My effects team, GornFX, was tasked with creating all of the practical effects. Most but not all of the effects were planned ahead of time before filming began. One of my favorite effects was the bodyguard head. In the film, commandos storm a warehouse and take down some bodyguard bad guys. I wanted the scene to be more gruesome than your typical gun fight scene, so during preproduction, I sketched out a drawing of a partially blown off head. I wanted the bottom jaw and tongue to still be in place because fully decapitated heads for some reason always look hokey. I gave the sketch to Ingrid (GornFX co-founder #1) and told her to go all out. I never actually saw the creation until the day we shot the effect and was pleasantly surprised to see the dummy sporting dentures and real cow’s tongue. Brains, bones, and blood were achieved by mixing food coloring, syrup, oatmeal, bananas, and some random stringy stuff.
The idea was to film our bodyguard actor, Dave, struggling with one of the commandos only to lose and get shot at point blank. The film would cut to another scene just as the commando pulled the trigger. Later, we would return to the scene to see the commandos standing above the dead bodyguard, but this time the dummy would be lying there. We filmed everything and I later edited the scene together as planned. In watching the completed fight, however, I felt as a viewer somewhat gypped by that scene. In one scene we see Dave, the live actor; in the next we see the dummy. True, it’s wearing the same clothes, but we all know that the cutaway scene has separated when the actor and dummy were switched. It lacked something.
The editing program I use is Premiere Pro version 2. Premiere has the ability to output a video clip in a file format called .flm which lays out all the frames of your video (yes, all 24 frames per second) side by side like a real filmstrip. Using this feature, I decided to output the final frames of the real actor bodyguard before he gets shot and manipulate them in Photoshop so that we can see the very first split second of his head exploding. This was done by painting blood and brains over Dave’s face for the last couple of frames after the commando pulls his trigger. To get the colors right, I pull up a frame of the bloody dummy and sample color values of the brains and blood. I use some motion effects to make the guts appear to be shooting outward. I also copy sections of Dave’s head and place them strategically around my brain explosion so that it appears as if pieces of skull are flying all over the place. I want the effect to take a fraction of a section – only a couple of frames if one second is 24 frames – so I copy and paste my work from one frame to the next and make changes that exaggerate the explosion and move all the elements outward. When you look at the before-and-after images keep in mind that it’s really the motion that will sell the effect. If we see a full-faced Dave then a gun flash then an explosion of guts and pieces of face flying everywhere, your brain will trick itself into perceiving what the eyes just saw. One more note about believability: the color values and motion blurs are really important to making this effect work. The final image manipulation is still being tweaked, (I’m not sure how large I want the pieces of face), but I already feel that the scene works much better than it did before. By seeing a couple of frames of Dave’s head splitting, the follow up scene of the dummy is much more powerful and the overall action is that much more visceral.
Of Multibodies and Muzzle Flashes
Willie, our brave female soldier, fires while she retreats, and the Multibodies scream overhead as they provide covering fire. What is a Multibody? Commandos of the future will be accompanied on missions by floating orbs slightly smaller than a basketball. The Multibodies will have multiple functions – they’ll sport several different lenses and motion detectors. They’ll even be armed with their own gun barrels and ammunition reservoirs. So that’s simple enough to imagine, but how are we going to build them? Hop on the internet, find a sci-fi modeling online community, post an ad, find an enthusiast, send an NDA, sign a contract, draft some sketches, wait six to 8 weeks for delivery, and check out what we have. Brian Thone, a.k.a. Knight Driver (that’s his call sign), made four of these guys for me with stuff he purchased from a dollar store and Walmart.
I asked Brian to build the Multibodies so that they could be mounted on the end of a broomstick. The idea was that I would digitally remove the sticks in post production. This could be done relatively easily provided that the camera was locked down on a tripod during the filming of all of these scenes. Why? Because the technique involves merging two clips of video – the first clip features the Multibodies mounted on sticks while the second clip is an identical shot without the Multibody props. To achieve the flying effect, I bring the two clips into After Effects. By stacking the two clips on top of each other, I can “erase” the parts of the top clip that have the Multibody sticks. This reveals portions of the underlying clip which fill the erased area with background. As long as the camera hasn’t moved, the result will be that the Multibodies appear to float. During production we filmed several different shots with a locked camera and were able to create effects like this one with Willie appearing with two Multibodies flying overhead.
Now that we have the Multibodies flying by we need to have some gunfire. In case you don’t already know this, real guns on set are very expensive. You have to get a licensed gun wrangler on set, and your insurance is going to be astronomical. Do you think your location will be okay with it? Every round you fire will cost money, and do you want to budget ear plugs for everyone on set? You don’t have to have a gun wrangler on set if you’re using non-automatic weapons, but I wanted to have a lot of automatic weapons. So we ultimately used replicas that were rented from Weapons Specialists, LTD, and all my actors had to learn how to pretend to shoot. I do the muzzle flashes in post production using After Effects.
The first step is to create a rough shape of the flash and track the muzzle of the gun throughout the clip. You can see in the image insert that I’ve drawn a crude flash like the ones we all drew when we were 10-years-old. The next step after the motion is tracked is to turn the visibility of the shape on only when the gun is being fired. This can be tricky to do, but you basically look for when the gun is being kicked back. If the actor did a decent job, you should be able to nail it after watching the video at full speed every so often. To achieve a better looking flash I play with the channel settings, the feathering tool, and duplicate the shape in different shades of white and yellow. I also separate sections of the surrounding environment and increase the brightness on the surfaces where the flash might reflect off of sides of the boxes, sections of the ceiling, and the actors face and arms. Subtle details like this will help seal the effect.
Then, I use Photoshop to create a simple shell casing image, import it into After Effects, and duplicate and animate it so that it looks like my gun is ejecting shells. After Effects has various tools that you can use to manipulate the axis and spin the shell casing image convincingly.
3D Digital Effects
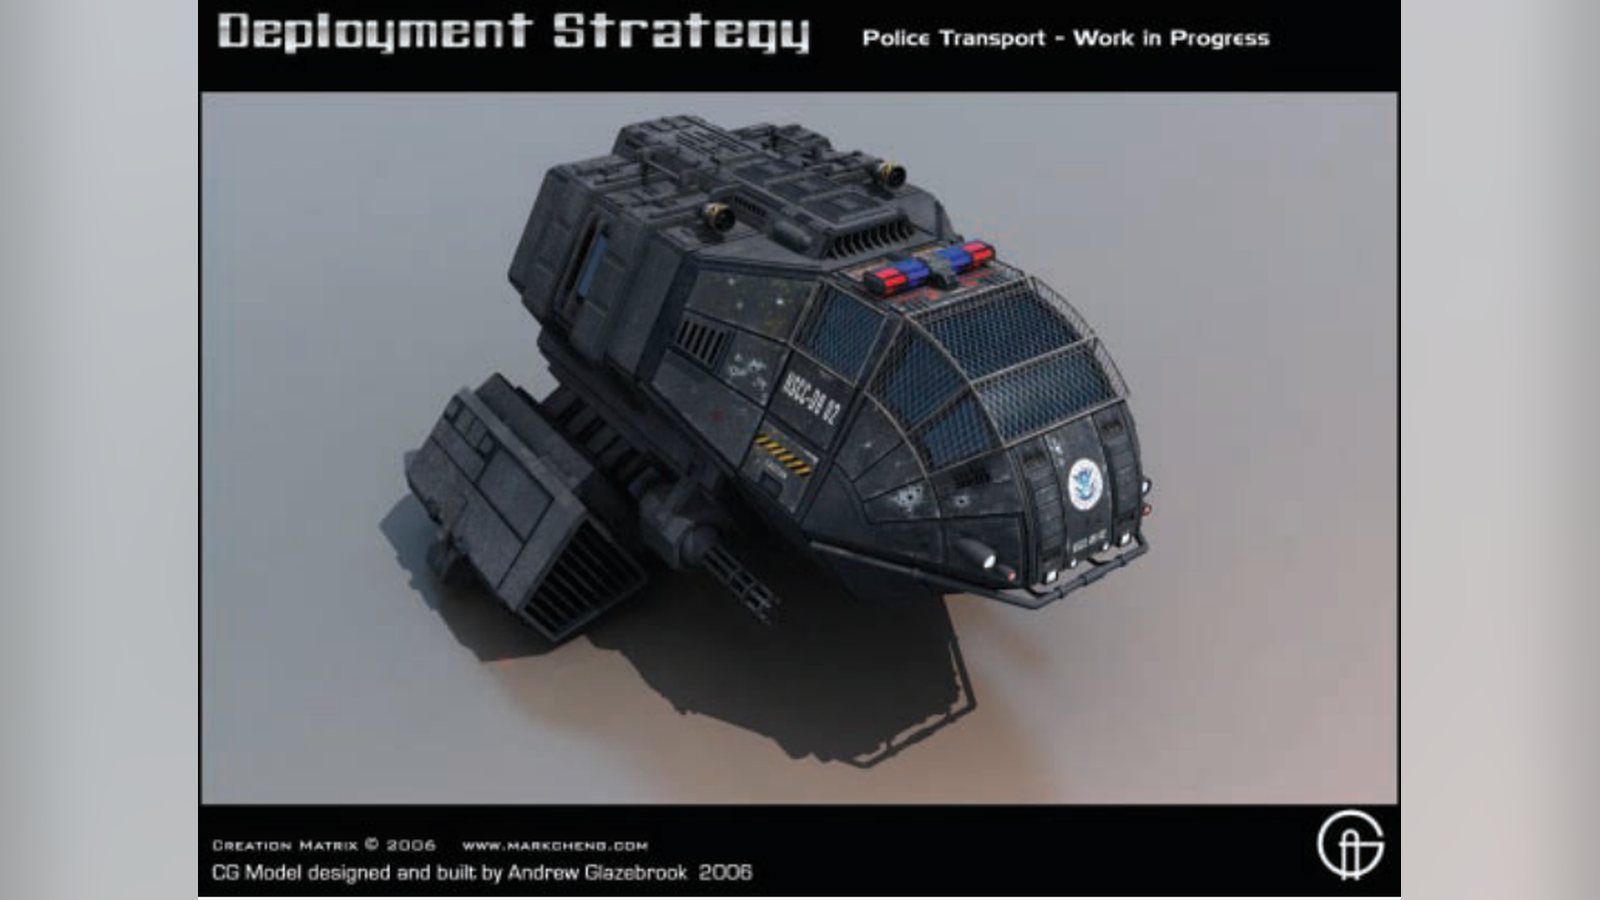
The dropship is an advanced police-military personnel carrier. It carries up to 6 troops and 2 pilots, and is designed to land in tight urban areas such as on streets between buildings on city blocks. The ship is capable of horizontal flight and vertical take-offs and landings. The sides and belly of the ship have flashing police lights and landing lights to illuminate troop deployment.
Above is a sample of the Dropship description I posted on a 3D modeler website requesting bids for someone to design the ship’s model. In the film, the commandos fly from their base in New York City to an industrial park in New Jersey. I wanted to use the exterior scenes of the city to establish that we are well into the future and that technology has advanced tremendously. The city skyline is dotted with huge floating ships that have docked in the city as luxury lines or cargo freights. The idea was that some type of anti-gravity technology had been developed and was slowly being rolled out in a controlled fashion so that it was mainly commercial and government vehicles.
The biggest 3D effect in the film is the dropship which the commandos ride in en route to their mission. The interior of the ship was my largest production set, and I needed to make sure that the exterior shots of the ship were as convincing and stylistically consistent with the interior. I felt that it was important to see the outside of the ship in order to help the audience believe the commandos were flying in a ship rather than riding in a subway or sitting in my basement. In the script and in my storyboards, I had the Dropship scene cut to the exterior of the ship periodically for this reason, as well as to create a thematic parallel between the turbulence the ship encounters and the discord amongst the commandos as they argue about the civil rights implications that artificial intelligence has created.
To achieve the dropship effect, I enlisted the aid of Andrew Glazebrook, a 3D designer residing in England. I found Andrew on one of the 3D graphics websites and really took to his work. He obviously took pride in his creations which featured incredible detail. Andrew (or Glazy, as he’s known by on the net) signed onto the project and created several 3D models including the dropship. I supplied him with the creative brief for the ship and let him run with it. I loved some of the details he came up with like the detail in the ship’s lights, the protective cockpit grill, and the battle scarring.
Glazy also created a floating public airbus and the commandos’ base of operations – the Department of Homeland Security’s Cyber Crime building. Standing in the middle of the city, the building is equipped with 4 landing pads on the roof and anti-aircraft Vulcan cannons that constantly scan the New York City skyline. With our recent history in NYC and within the context of our story’s anti-gravity technology, it made sense to me that the governments of the future will take strong precautionary measures in regards to air attacks of any kind.
Once models are created, the next step is to color the surfaces in a process called texturing. Texturing involves more than simply giving a surface the color black, for example. It is also the process whereby the light refraction is configured. For example, you wouldn’t expect a piece of toast to reflect light the same way a plastic cup would. During the texturing process, the designer assigns a gazillion different values to each surface all with the intention of making the model appear as photo realistic as possible. To help speed the process, Glazy brought on another very talented designer named Simon Hilton, another England native, who helped texture and tweak the final models of the headquarters and the floating bus.
Most of the images you’re seeing here are still concept art and not clips from the final film. I try to do a lot of Photoshop tests during the design process to make sure that I’m comfortable with the results and that I’ll actually be able to pull off what I intend to. With most of the models designed and textured, the next step is to get the storyboards and files over to the animation team that will light models to match the background plates and animate them based on the boards. This is the stage I’m at right now. With a little bit of luck, you’ll be reading this article while an animation team in Italy is working on the lighting and animation for these scenes. Mark Cheng is a filmmaker residing in NJ. He is blogging the production of his film on his website: www.markcheng.com.
Andrew Glazebrook, a freelance 3D artist, can be reached through his website: http://glazy.blogspot.com.
Simon Hilton, a freelance 3D artist, can be reached via email at: [email protected].
Related filmmaking guides
Keep learning filmmaking
Want more lessons like this? Join StudentFilmmakers free for live webinars with working pros, and stream on-demand filmmaking classes in cinematography, directing, screenwriting, sound and post.