By Hali Gardella
Proper stereographic cinematography on a budget isn’t easy. Hali Gardella explains where film students should start when shooting 3D with two cameras.
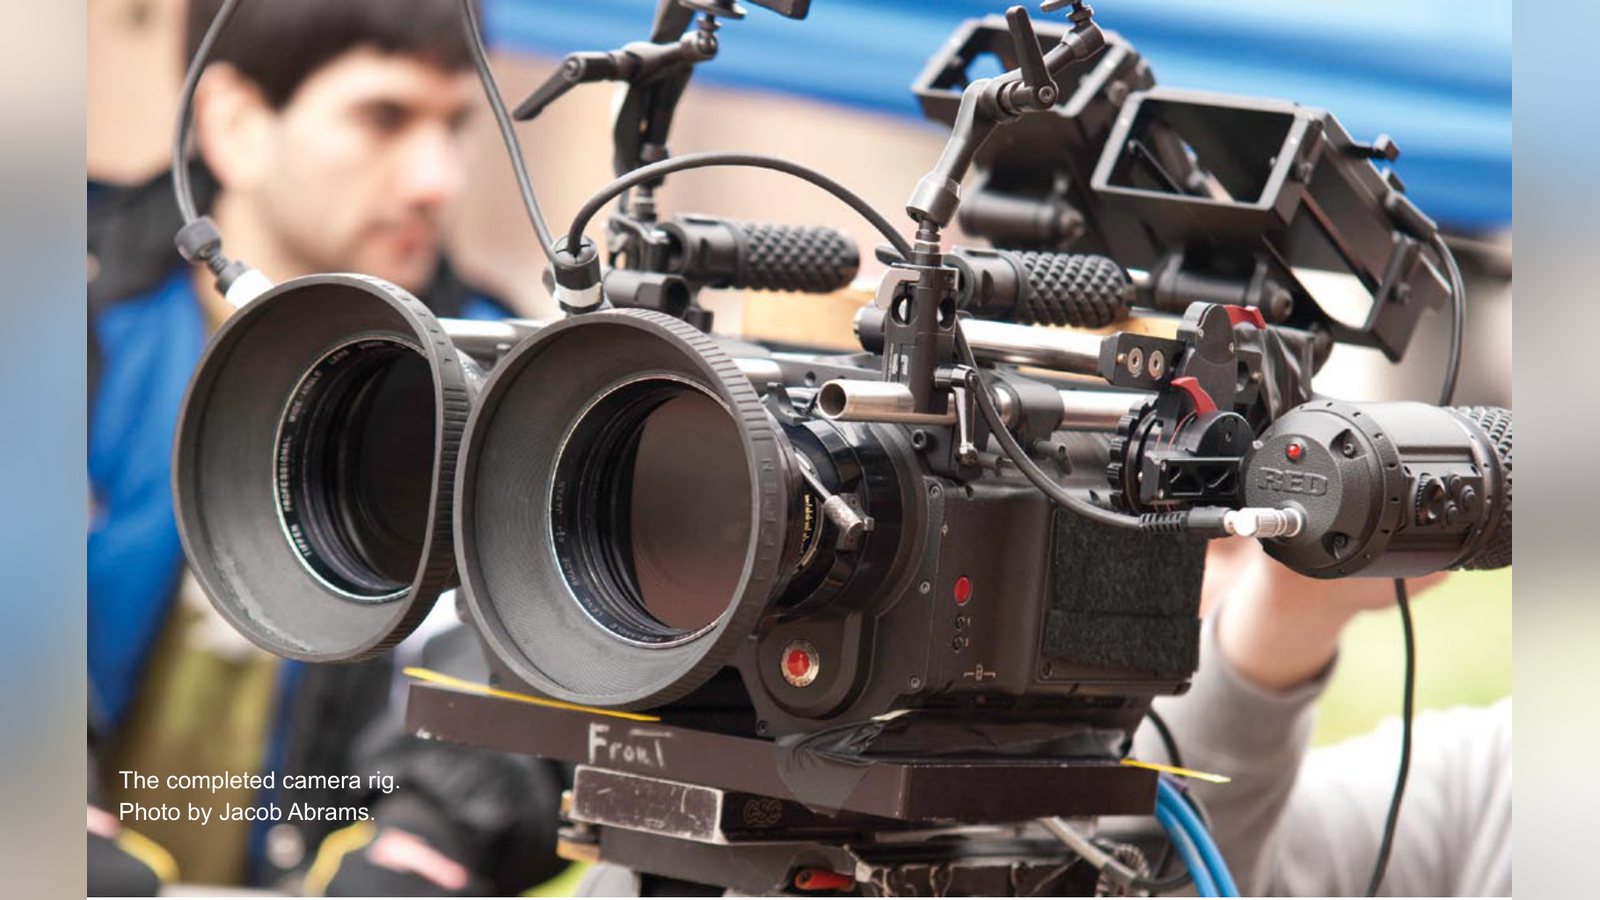
Do not be fooled. Proper stereographic cinematography RED ONE cameras on a limited budget is not easy to accomplish. Before putting any money or time into your 3D movie, you need to make sure you have thought out all of the details of a two camera production. This will require extensive research, but hopefully this information will be able to prepare you, a student filmmaker, to delve into the realm of stereographic cinematography.
Recently, I was the producer on The Florida State University 3D Project, an interdisciplinary collaboration between departments at the university (The FSU College of Motion Picture Arts, The College of Communications, The Department of Scientific Computing, and Seminole Productions). For this project, we would attempt to combine live-action 3D scenes shot in 4K on the RED ONE cameras and 3D Computer Generated scenes featuring video-game style avatars of our main characters (made by The Department of Scientific Computing).
From January to March 2010, our teams researched RED ONE stereographic cinematography with the assistance of Rexford Metz, ASC, an informed specialty cinematographer with a wealth of knowledge on RED shooting. We tried to research the correct approach, technically and aesthetically, to stereography. We found that there was no single approach. In addition, it was hard to find advice geared toward the film student demographic; we had the cameras needed to make high resolution images, but our budget was far from that of a professional production.
We considered many options for the live-action portion that we found ideal, such as using a beam-splitter camera rig. A lot of time was spent researching the use of equipment and practices that turned out to be completely inaccessible to us, as students. It soon became evident that the cost of a modest production for RED ONE 3D could easily rise to well over $10k per day, just for equipment. At six days of production, that was unreasonable. We had to scale back our equipment from what we wanted to what we absolutely needed in order to stay within a reasonable budget. Mainly, this meant that we would be shooting with a side-by-side “rig”, really just a plate that attached two cameras together, and that we would have to adapt our shooting style to our new equipment limitations. Convergence Distance, Lenses, and Filters
When shooting side-by-side with RED ONE cameras, you should be prepared to work with a minimum interocular distance (the distance between the centers of the two lenses) of 7 inches, because the cameras are large and you will need to have space between them to connect your cables. The interocular distance between your eyes is 2.5 inches. Simply, what this means is that your ideal point of convergence (a comfortable place to view objects in a shot) should be at least 35’ from the cameras (actually, from the cameras’ image sensors). When the interocular distance is at 2.5 inches, as it is with a beam-splitter rig, you can effectively converge objects 3-5 feet from the cameras. At 7 inches, every object in the shot that is within 35’ of the lenses will show up twice on the screen. It is a similar phenomenon to trying to read a book that is two inches from your face. You will get a headache.
We did a shot in which a football player ran down the bleachers in our stadium. Two dimensionally, it was a beautiful perspective shot of the bleachers fading into the distance. The football player was consistently more than 35’ from the camera, and his image converged nicely in post; however, the area of the bleachers that fell closer than 35’ from the camera began to separate into two images. The most separated areas were closest to the camera. Remember that foreground elements must also remain at the correct distance for proper convergence.
Depending on your interocular distance, I would recommend calling the technicians at 3ality and Element Technica to find out more about your convergence distance requirements.
Shooting a subject at a distance of 35’ will require the use of long lenses in order to get medium and close-up shots. We mostly stuck to the 135mm and 180mm lenses from two sets of Zeiss Standard Speed Primes for 35mm format (because we shot 4K).
Also, remember that you cannot use a traditional matte box around the lenses because they are designed for single camera use; as a result, you will need to adapt the way you attach filters. We used two clamp-on ring kits that fit over each lens. They include flexible lens shades and are made to hold 4.5 inch round filters in place. Make sure you have the correct size clamp-on rings and filters for your lens size. We used two Tiffen 4.5 inch round ND filter kits. If you plan to combine filters, you may need four or six filter retainers in your clamp-on ring kit.
Synching the Cameras: Genlock and FIZ
The cameras will need to capture the image in exactly the same manner in order to achieve the desired 3D effect. This means syncing the frame capture and the lens adjustments. To sync your cameras, you need to use a genlock and FIZ.
A genlock is a device that is attached by cables to each camera that will sync the recording to the exact frame. You will need your cameras to record in perfect sync to get a cohesive 3D effect. We used the Gen-10 made by AJA. It was a cost effective brand and worked for multiple frame rates. Your camera’s manual will have directions on the genlocking process.
Focus. Iris. Zoom. (Or FIZ.) These are the variable functions of a lens that will change the qualities of the image that is captured by each camera. In order to keep both images at the same focal distance, exposure, and size, you will need to operate these functions simultaneously with extreme precision. A FIZ is a wireless follow focus system that attaches to the lens to adjust the focal distance, f-stop, and lens size (if you are on a zoom lens) from a remote control, or Sender, that the AC can operate while standing meters from the camera. FIZ units are typically used in single camera shooting, but they can be adapted for stereographic shooting.
For simultaneous lens adjustments, you will need to have two FIZ units. One FIZ must become the slave unit. A slave unit is made by programming the MDR (the computer inside the FIZ) to respond to the remote control of the master unit. Once you have slave and master FIZ units attached to each lens, the AC can simultaneously adjust both lenses with precision using the same remote control. Preston Cinema Systems manufactures the FIZ and we had them program a slave unit before they sent us the units. Test your FIZ unit before production. During our shoot, we found that the MDR on the slave unit had not been properly programmed. We had it replaced quickly, still costing us valuable time.
FIZ is a widely used brand, but they are expensive to rent. If you cannot afford two, you should look for another synched follow focus system. You can adjust the iris and lens size by hand if you do not plan to change them during the shot. I do not recommend making any manual changes to the lenses during the shot.
Camera Alignment
Your cameras will also need to be properly aligned, so that they are facing the same direction. Simply attaching them to the rig or plate is not enough. The FSU 3D Project shot with a basic side-by-side camera plate that had no motors or mechanisms for aligning the cameras. In order to make sure the cameras were perfectly aligned on the plate, we used alignment charts to realign the cameras every time we moved the camera for a new set up. Frequently, we would use the charts to recheck the alignment if we had spent a long period of time on a particular shot, especially if the shot required movement, like dollies or pans.
Aligning the cameras manually is time consuming and requires acute adjustments. You will need to have thin shims to place underneath the camera to hold it in place. To align the cameras with the chart, match the left camera cross hairs with the corresponding crosshairs on the chart; do the same with the right camera. Alignment takes time to perfect, so I strongly urge you to practice before your production begins. The chart is expensive to purchase, but a necessary investment for a stereographic production using this type of plate. You will also save thousands of dollars by not renting an expensive motorized rig. We used the Fairburn 3D Chart made by DSC Labs that sells for around $1300. Camera Mount for Added Weight
When two RED ONE cameras are attached together, in combination with two large lenses and other accessories, the weight will be much greater than single camera shooting. You will want to account for this by making sure to mount your cameras on a head that can accommodate this weight. We used an O’Connor head for cameras over 100lbs. The O’Connor head was mounted to a Fisher 10 dolly.
Insurance
Any instance where you are using your school’s RED ONE cameras for an extracurricular project, you should make sure you are still covered by insurance. Check your administration, because your school’s policy may not cover you. It is not only wise to insure your school’s property, but there are also hefty insurance requirements when renting equipment from a rental house. Production Constraints
Getting equipment is step one. Now there are new technical constraints that you will need to have in mind. Huge variables will arise depending on the type of rig you are using. No matter what, it takes much longer to set-up a shot with two cameras than with one. Do not overlook the time it takes to align the cameras before each shot. Each morning, expect to take at least an hour to reach camera alignment, in addition to the time it takes to build and mount two cameras. If the cameras are accidentally knocked out of alignment during a set up, it will take additional time to realign them. The new equipment will be a challenge to learn. Take as much time as possible to practice before the set. It will take longer to troubleshoot an issue with unfamiliar equipment.
During our production, we had the privilege of working with KT Comkowycz, an FSU Film School alumni who is currently working in LA as a union 1st AC. She had experience working with other 3D rigs from 3ality and Element Technica. Still, on the first day of our production, we completed only four shot set-ups. There was a huge learning curve we had to overcome because our budget was not large enough to rent the equipment for trial days before the production. Each subsequent day, we added to that number. On day six, we got 10 different shots.
As a student or novice filmmaker who is interested in shooting stereographically with the RED ONE cameras, you will have to conduct your own research to see what shooting method is right for your production. This article presents the way we accomplished it, but like I said, there is no one method.
Hali Gardella is a filmmaker from Sarasota, Florida who specializes in independent film production. As a writer, director, and producer, Hali is very interested in making films abroad. She recently traveled to Haiti to film a documentary about reconstruction efforts after the earthquake. She is currently a senior at The Florida State University College of Motion Picture working on her thesis film. She was the producer of the FSU Film Project.
Keep learning filmmaking
Want more lessons like this? Join StudentFilmmakers free for live webinars with working pros, and stream on-demand filmmaking classes in cinematography, directing, screenwriting, sound and post.