By Daniel Gaucher
Deliverables scare many offline editors. Daniel Gaucher explains the layoffs and outputs needed at each stage of editing, from rough cut to online.
In the world of the professional offline editor, you are often coddled by the post supervisor and protected from the horrible monster known as “deliverables.” Whether working with a producer or for a client, there are several fine cut stages, wherein many eyes watch your edit and comments are handed back for further improvements. Your expertise lies in creating a story with rhythm, flow and emotion. You have mastered the rollercoaster of conflict and resolution using dialogue, action and music as your building blocks.
However, when all’s said and done, you still have to get that piece of gold out of the machine and to waiting hands for review, broadcast or screening. In the past, you may have had the luxury of finishing your part, and then, sending your sequence to an online editor, someone whose expertise lay in uprez, color correction and the myriad of mastering formats. These days, the “one man band” mentality has quickly marched forward, overtaking not only the independent producer, but a lot of unprepared professionals also.
The modern editor is expected to have a broad range of knowledge which has come to include graphics, effects, soundmix and online. After over a decade of editing in Hollywood, it was only within the past three years that I was called upon to do my own color-correcting. Learning to read scopes, adjust gamma and achieve perfect skin tone would fill an article unto itself. Suffice to say, it is a fantastic skill to learn, and invaluable in making your piece look as professional as possible, even at a fine cut stage. Even more recently, the world of HD mastering knocked on my door and finally had to face the “one man band” tune.
Following are some of the different forms of layoff for the different stages of editing. Check with your client to make sure these are acceptable for their viewing. When you reach the final stages of layoff, your client will most likely have a set of printed “deliverables”
which must be met to the letter. This list goes from the earliest stages to that final output.
1. Compressed QuickTime Movie: This is usually used during a rough cut to fine cut stage. It is low quality, easy to transfer via email, microdrive or FTP, and only illustrative of the pacing of the edit, not of the picture quality. The most common method of output is to set in and out points on your timeline (either a section or the entire piece if completed), render all, and go to File/Export. Save as an MPEG4 (improved), for wide compatibility, with 320×240 scaling at 300kps. Set for 15fps with deinterlacing (or “single field”) on if possible. If you are in widescreen you may need switch to regular MPEG4 to adjust to 320×180 with preserve ratio on. These settings have worked for me before, but technology and compatibility are always improving, so research blogs or experiment for settings that suit you best. Your file size should be about 3MB/minute of edited video. It is now common when I work for History
Channel or Discovery to send cuts-in-progress this way for review via FTP.
2. MPEG2 for DVD: This stage is often used for a fine cut approval, where picture quality is of importance, especially if graphics have been placed. Most
NLE’s come with this output setting as a menu option under File/Export.
You will either make a QuickTime
“shell” for your output, similar to a reference movie where the DVD authoring program will still need to encode the actual media files, or you may actually output an MPEG2 file directly, the format needed to play on consumer DVD players. Either way, you will need an authoring program to create menus and burn a playable
DVD. This format begins to reflect good picture quality, but remember…
It is still a compressed format and is not acceptable as a master layoff.
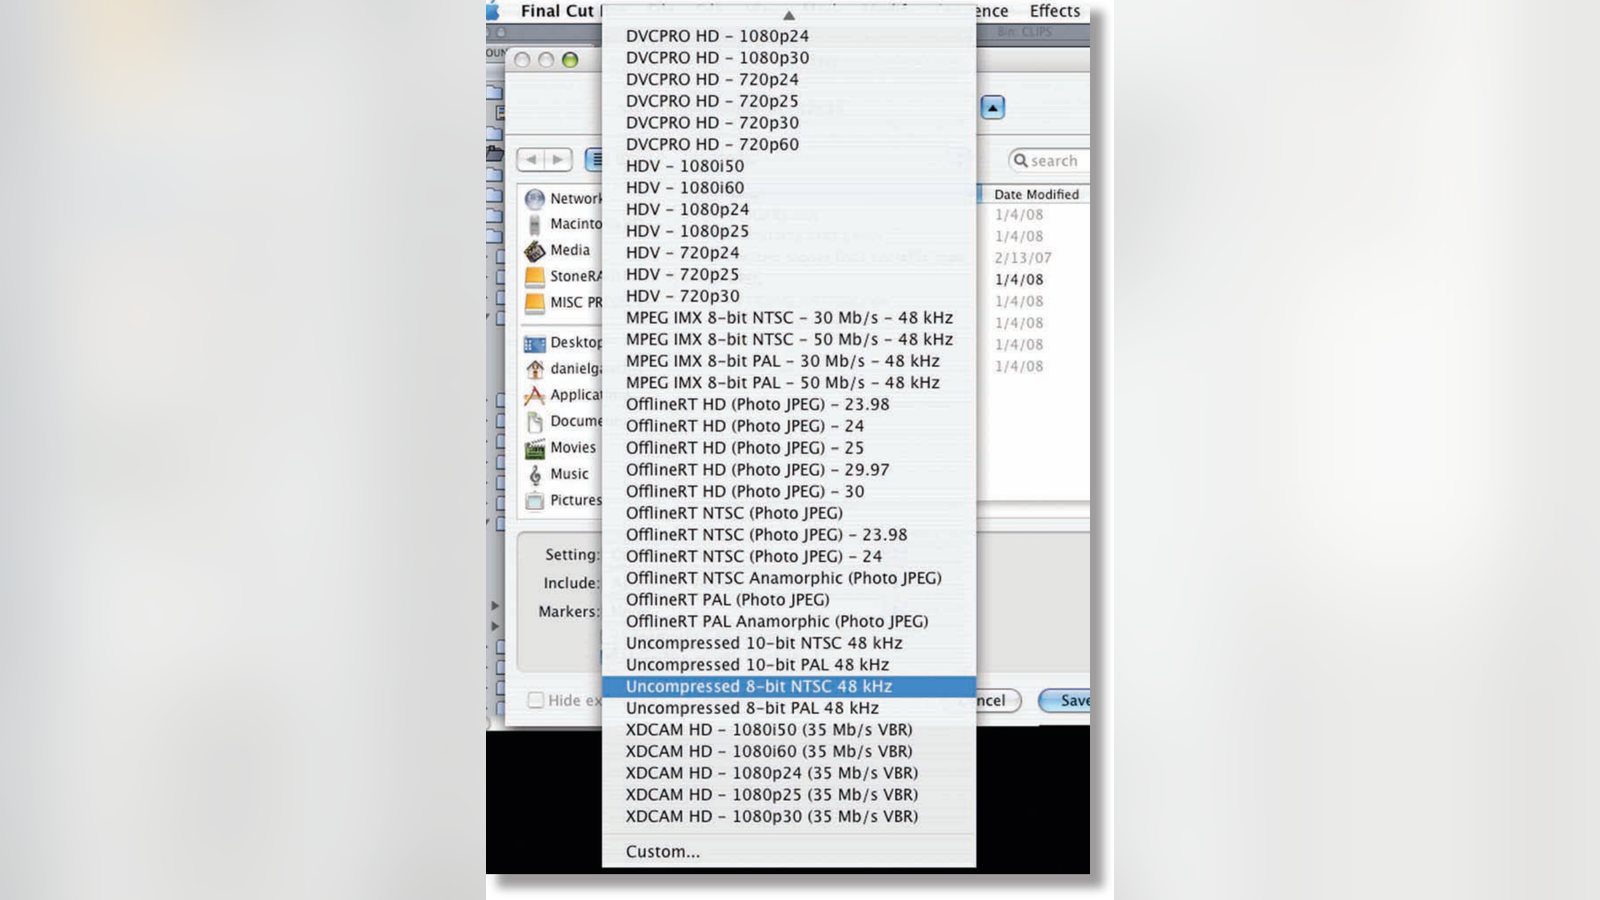
3. Uncompressed QuickTime Movie:
This setting shows up under “File/
Export/Send to QT Movie” (AVID) or
“File/Export/QuickTime Movie”
in
Final Cut. The idea here is to get an uncompressed movie, also called same-as-source, into a stand-alone file, which can then be re-imported into a
NLE or graphics program with no loss of quality. It also serves as a digital archive file. The only problem… File size is quite large and will require it to be stored on a hard drive. This item is usually included in the dreaded
“deliverables” and is expected by the client.
4. Layoff to Tape: In this brave new world of HD and variable frame rates, layoff to tape has become much more complicated than ever before.
Basically there are three questions you need to ask yourself. First, is this 720 or 1080 HD? Secondly, is this interlace or progressive? Finally, is this 23.98, the future in hand | hdexpo.net
29.97 or 59.94 frames per second?
These questions should properly have come up before you digitized any material. At this point, however, you have to make sure you know what format you need to master in.
Case in point, on my last job we were going to master in 720p at 23.98fps.
This required a Panasonic DVCPRO
HD deck, which we rented. At the last minute the client decided that a
1080p layoff would be better, so the
Panasonic deck went back and was switched out for a Sony HDCAM
SR deck. We then had to make adjustments to both the output of the video card and the editing program.
We discovered one timeline had been improperly created at a 59.94fps rate, forcing us to rerender the entire timeline to make it compatible also.
In the end, footage from different sources, incompatible frame rates, and different resolutions all combined to eat up an entire day of online as we corrected our own mistakes to make the final output work.
So, you’ve honed the perfect story, but now reality sets in… You have to get it out to share it with the world. You will probably tread down one or two of these paths along the way, learning from experience as you go.
My advice is to learn what you can before you start the process, by knowing what your final output will be and the best way to get there. If you know where you are headed, the entire trip will be much more pleasant. Daniel Gaucher is an Assistant Professor of Visual and Media Arts at Emerson College.
He established himself in the production world as one of the original editors for the hit series, Blind Date. Since then, he’s crafted a series of successes including 5th
Wheel, Queer Eye for the Straight Guy, and
Extreme Engineering. His work has aired worldwide on NBC, MTV, Bravo, A&E,
UPN, Spike, VH-1, TLC, Discovery, PBS and the National Geographic Channel.
Screen grabs by the author illustrating the different settings.
Related filmmaking guides
- Top video editing software for students
- ADR: automated dialogue replacement explained
- The power of sound in film
Keep learning filmmaking
Want more lessons like this? Join StudentFilmmakers free for live webinars with working pros, and stream on-demand filmmaking classes in cinematography, directing, screenwriting, sound and post.