Reference: StudentFilmmakers Magazine, January 2007. Final Cut Pro Editing Power Tips: Techniques That Can Save You Time by Larry Jordan. Pages 38 – 40.
I am constantly surprised by how many editors create their sequences by dragging clips from the Viewer to the Timeline. Which is fine, I guess, it’s just extremely slow and not necessarily accurate.
Why is speed so important? Because we edit clips to the timeline hundreds of times in every show we cut. Every second we can save in this process adds up to a huge time savings.
What this article will do is show you a variety of better ways to edit — techniques that can save you huge wads of time. So, if your time isn’t important, then go-ahead, turn the page. But, if you have other things you need to do — other than sit around slowly dragging clips to the timeline, this article could change your life.
Two Types of Edits
There are two types of edits in the non-linear world: overwrite and insert. An overwrite edit replaces whatever clips it lands on, without changing the duration of the timeline; unless you are adding the clip to the end of your sequence. An insert edit creates a break in the timeline, pushing all clips to the right of the break even further to the right to create room to insert the new clip at the start of the break.
Using an overwrite edit as your standard edit is a really good habit to develop, especially as you start to work with audio and B-roll, as it will give you the results you expect. An insert edit should only be used as a special case.
The reason for making this distinction is that there are five ways you can overwrite edit a clip to the Timeline from the Viewer; and only one of those five involves dragging the clip to the Timeline. Plus, there are five more techniques that perform an insert edit.
High-Speed Overwrite Editing
You know the routine: load a clip from the Browser into the Viewer, set the In, set the Out… So far, no surprises. It’s what you do next that makes a difference. In these examples, position the Playhead in the Timeline so that it is exactly where you want your new clip to start.
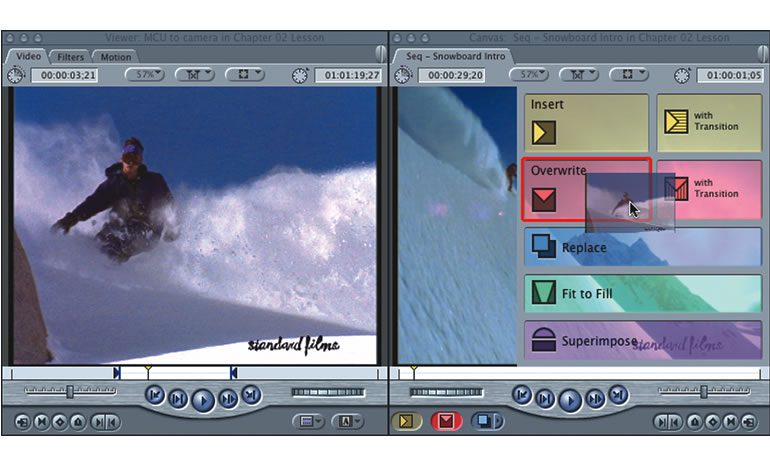
Technique #1: Grab the clip and drag it, but this time, drag it sideways to the Canvas and drop it on top of the red Overwrite overlay. Poof! The clip shows up at the position of the Playhead in the Timeline. And, it is much faster to drag the clip to the Canvas than all the way down to the Timeline.
Technique #2: Grab the clip in the Viewer and drag it on top of the red envelope in the lower left corner of the Canvas. Poof! Again, it shows up at the position of the Playhead in the Timeline. And it is even faster to drag to the red envelope than it is to drag all the way over to the red Overwrite overlay in the Canvas.
Already, we are starting to pick up speed!
Technique #3: Let’s speed up even further. You can edit a clip from the Viewer to the Timeline simply by clicking the red envelope, in the lower left corner of the Viewer.
Suddenly, we’ve gone from taking 5-10 seconds to drag a clip to the Timeline to a single mouse click! Woosh!
Technique #4: Here’s the keyboard shortcut version of clicking the red envelop – press the F10 key. At this point, one of two things will happen: either the clip will edit to the Timeline at the position of the playhead, or every window on your screen suddenly changed color and flew off into a million places. Don’t panic. You have not permanently destroyed your system.
Preventing the Destruction of Everything on Your Screen
If the clip nicely edited to the Timeline, you can skip to the next section. If, however, your screen is in a shambles, first, press the ESC key to bring everything back and keep reading.
Built into Mac OS X 10.3 and 10.4 is a feature called Exposé. Be default, Exposé is programmed into key F10.
To change the keyboard settings for Exposé, go to the Blue Apple in the top left corner of your monitor and select System Preferences. Click the icon for Dashboard/Expose (OS X 10.4) or Exposé (OS X 10.3). Hold down the Control key and change all the lower pop-up menus so they look like ^F10 – the icon that looks like the roof of a house is the symbol for the Control key.
This means that in order to invoke Exposé you now need to press both the Control and F10 keys at the same time.
This means that you can use F10 to edit in Final Cut, while using Control+F10 to rearrange your screen using Exposé.
Technique #5: You can, if you insist, still drag a clip to the timeline. However, keep an eye on the cursor. As you drag the cursor will change shape. If the cursor points down, you will do an Overwrite edit. If the cursor points to the right, you will do an Insert edit.
The shape of the cursor is determined by its position relative to the thin, horizontal line about the middle of the track. If the cursor is above this line, it will do an Insert edit; if the cursor is below this line, it will do an Overwrite edit.
I’ve found that in my editing, if I want to be fast and precise, such as editing my story or adding B-roll, I will use one of the first four techniques. If I want to be fast, but don’t care about accuracy, for instance in spotting in a music cue or a sound effect, I’ll drag. Dragging can be fast, it just can’t be both fast and accurate at the same time.
High-Speed Insert Editing
Just as there are five ways to do an Overwrite edit, there are five ways to do an Insert edit. Fortunately, they are similar to the ways we’ve already learned for overwriting so we can go through them much more quickly.
While Overwrite edits revolve around red buttons, Insert edits use yellow ones. So, given the five techniques we just learned, here are the Insert edit equivalents:
• Drag from the Viewer to the yellow Insert overlay menu in the Canvas.
• Drag from the Viewer to the yellow envelop in the lower-left corner of the Canvas.
• Click the yellow envelope.
• Press the F9 key (again, remember to reset this in System Preferences, or Exposé will get in your way).
• Drag to the Timeline, making sure the cursor arrow is pointing down.
For me, the big benefit to using these techniques is that it allows me to concentrate on what made me become an editor in the first place: telling stories. Now that I can click one button and have my clip instantly show up exactly where I want it on the Timeline, I can spend my time thinking about how to tell a better story, without worrying about whether the software can keep up.
Larry Jordan is a member of both the Directors Guild of America and the Producers Guild of America as a television producer, director and editor with national credits, and Apple-Certified trainer in Digital Media. Based on Los Angeles, he has written two books on Final Cut Pro, and publishes a free, monthly newsletter on Final Cut Studio. His website at www.larryjordan.biz.