By Jon Firestone
A camera jib adds production value fast. DP Jon Firestone explains how to set up, balance and operate a jib for smooth, cinematic moving shots.
One of the first things I learned in film school was to dolly not zoom. There is something magical about moving a camera through space and seeing the perspective change during the shot. I’ve spent a lot of time over the last few years finding different ways of moving the camera, but of all the ways the jib is my favorite.
One of my first jibs was an EZ FX Jib, and during this time I landed a job shooting a bunch of apartment complexes. The director wanted nice jib shots. This was my first chance to do a lot of jib setups and to learn what made a jib shot dramatic. I was frustrated that a lot of the shots were unimpressive and would be just as effective with a pan or tilt of the tripod.
The arm on the EZ FX Jib was about six feet long, limiting the kind of shots we could get. Jibs are much more impressive when you are closer to the subject, so that the perspective change is much more dramatic. Also, jibs are great for revealing shots. I started using foreground objects to make the movement more apparent and started using jibs for everything.
In my studio I would leave the jib set up on a dolly and rarely put the camera on sticks even for still shots because the camera could be moved more easily like this. Always trying to come up with new shots I could get with my jib, a few of my favorites include facing the camera 90 degrees off the arm and positioning the camera so that a person or a vehicle could be coming right at the camera and the camera could swing out of the way, catching a profile of the subject, and continue the arc around to watch the back of the subject as it moves away. Just like using a curved dolly track, but with the advantage of not having to keep the track out of the shot, and there is no track for the subject to walk or drive over.
I also use a jib as a problem solving device when doing dolly shots. I can hang the camera straight out over the end of the dolly so that I can make a longer dolly shot without the track becoming visible. Or I will put the track to the side, out of frame, and use the same 90 degree camera trick to fly the camera over trackless ground.
The biggest downside to jibs is their complexity, not only to set up but to get a good shot. The more capable the jib, generally the more complicated the setup is. One trick is to securely mount the jib to a doorway dolly. I only use the dolly to easily move the jib around. For any dolly/jib shots, I will move the dolly onto tracks.
One problem that you have with doing dolly/jib shots is that any movement on the dolly can be amplified by the jib arm. So you have to be careful to keep the arm from wobbling. I like to hold the jib with both hands in different places on the arm to help dampen any unwanted movement.
Since the movement of a jib is considerably different than a tripod, you encounter new problems you don’t have with traditional tripod shots. For example, when working with jibs, I commonly start from near the ground facing up at the subject, then bring the camera to a high angle, now looking down at the subject. Rarely do you ever have this extreme of a tilt on tripod shots, and it must also be done smoothly while concentrating on booming up and panning. The problem that becomes immediately obvious is that traditional tripod heads put the pivot point beneath the camera and nowhere near the center of gravity of the camera. This causes the camera to try to pitch forward or backward at the beginning and end of the tilt, making a smooth tilt difficult.
Some tripods have springs which counter this, and gear heads deal with this issue, but I prefer to deal with this problem by under slinging the camera. By under slinging the camera, the pivot point can be brought very close to the camera’s center of gravity, which will allow a full range of tilting, while keeping the tilting force even throughout the full range of movement.
Being an indie filmmaker, I’ve had to come up with some innovative solutions to save money, and still get the job done. I love a good monitor to shoot with, and when operating a jib from the back, you need a monitoring solution. Preferably something battery operated that can be mounted on the jib.
When shooting with HDV, I will set the camera to display its information on the external monitor, so that I can see the focus information. The beauty of many of these new cameras is that they will display in feet or meters what the current center of the depth of field is. I can eyeball it or set focus at different marks and pull focus on those numbers using a LANC type controller. This is great when using a standard definition monitor when shooting HD and still trying to get a sharp focus.
Fortunately, I almost always shoot my jib shots with the lens at full wide. Remember that the perspective change is more evident the closer you are to objects in the scene, so generally I will move the camera in close and shoot with the lens full wide. The great thing about shooting wide is that the camera has significantly deeper depth of field making it much easier to maintain focus. You do lose the separation you get from a shallow depth of field, but what makes jib shots so nice is their movement.
Cheap Monitor Solution
I usually use an inexpensive DVD player with a 7-inch 16 x 9 screen as my jib monitor. These can be bought for about $150 and when in monitor mode can often last nearly 7 hours on their built-in batteries. The screen is 16 x 9 and has a decent picture.
I bought a Polaroid player I had tested and found it would accept a PAL signal as well as NTSC, which was perfect when shooting a Z1U in 25P mode. The biggest limitations to these monitors: they are bulkier than professional monitors, and they lack professional jacks and mounts. I use a Matthews monitor mount with thick strips of adhesive-backed Velcro to keep the monitor in place.
Another advantage to the Polaroid monitor is its ability to invert the image which is perfect for using with an M2 35mm lens adapter, which flips the image in the conversion process. In daylight situations, the intense sunlight will almost always wash out the image on the monitor to the extent that you can’t really see where you are aiming the camera. I’ve improvised sun shades out of foam core and gaff tape. I’ve also used VR goggles for this, which works relatively well, but it takes some practice to get used to. Since the image moves with your head, it is instinctual to move your head to change the framing instead of moving the jib arm.
Jibs can create amazing shots, but they are only as good as the operator. These inexpensive jibs have their limitations, and it takes a little more skill on the operator’s part to overcome these limitations. There are a lot a different types of jib shots, and the more complicated the more practice it takes. I generally tell people that if they want to get into doing jib shots, there are a couple things to remember. You need to practice a lot with a jib to get really good with it. Especially when doing head panning and tilting, while pulling focus, and booming the arm. You also need to allocate enough time in your schedule for the jib shots. There is setup and breakdown time, as well as the time it takes to practice the shot, and it will commonly take more takes with the jib because you add to the fact that the jib has to hit its marks as well. My first experience with a jib was with a little 6 ft. Porta-Jib. These jibs are a bit pricey but are a good quality. The jib I used was an older model with no frills. It took a lot of setup time, with lots of parts and pieces that could get lost. The jib supported a lot of weight and could handle big cameras but had limited movement.
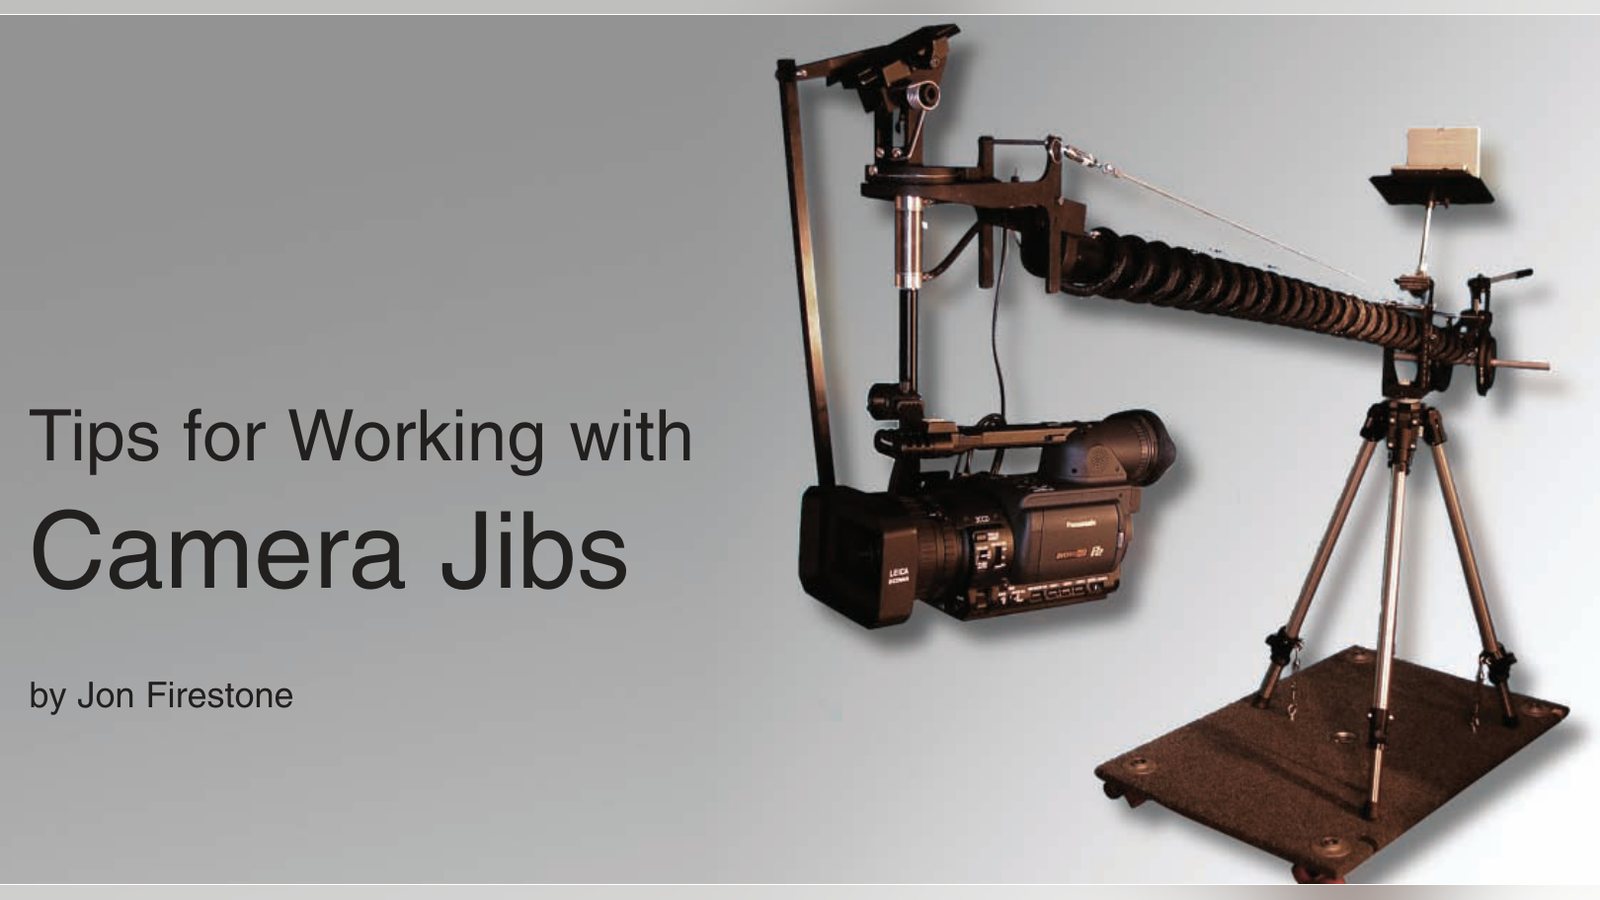
The next jib I worked with was an EZ FX Jib, with the EZ FX Handle. This was a great improvement from the Porta-Jib in terms of ease of setup and also capability. The design was straight forward and was made to set up fast. It could also handle a heavy camera, and you could do pan and tilts from the head easily with the EZ FX Handle. I loved all the new shots that we could do, and the handle allowed us to even control the pan and tilt from a fairly high angle, but this is when I first realized that the pivot was a problem. My brother and I ended up re-rigging the head, inverting the mounting plate and a tripod head to create our own improvised underslung head. This worked well enough that we rarely changed the configuration after that. My brother kept that jib and still uses it to this day.
I later acquired a Cobra Crane 2 jib and had a little trepidation at first. This jib had a nice long arm and the ability to tilt the camera from the base of the jib. It was even able to handle a fairly heavy camera. But I was wary of the fact that it used a tripod head to support the whole jib. When the Jib is loaded with a 25 lb. camera and the weights it takes to counter balance it, the tripod head it sits on is likely to be over the tripod head’s rated capacity. I found a Bogen 3066 head to work perfectly for this, and it seems to handle the weight fine. I made a couple modifications to this jib right away, including a monitor mount, and I replaced their weight mount with a heavier duty mount. I would also commonly mount small cameras, underslung from a Cardellini clamped to the camera’s handle to get shots starting right on the ground. I always use a safety strap when doing this. I grew to really like this jib. Although a little less portable than the EZXF jib, the tilting capability was nice and tilted from close to the camera’s center of gravity which made for smooth tilting. It has its limitations. Mostly the fact that I can only tilt, with the camera looking straight off the end. But overall it’s been a good jib.
My latest jib acquisition was a Dykortech Advanta-Jib Lite. I was cruising through NAB this year and ran across this unique jib. It was designed for cameras 10 lbs. or less but has a nice long arm and a panning and tilting head that is operated from the back of the jib. Unlike most remote head systems I had messed with before, this used a system of hydraulics and cables to get the job done. But the operation was more intuitive than the other heads I had seen in that it used a handle like that of a tripod, and the movements correlated directly with the head of jib. One of the things that concerned me about several of the remote heads was the joystick design of the controllers seems to take a lot of practice to get good at. There is also no tactile feedback. What I liked about the Advanta-Jib was that I almost immediately had a sense of the jib. It was fairly easy to track people with it, and I could feel any resistance the camera was giving me just like a tripod. All this and it didn’t require an additional tripod head like many others do, and it was priced in the range of most remote heads alone. If I had to operate a jib, with a pan and tilt head by myself, this was the jib to do it with. While this jib has some really nice advantages, it hasn’t been without its catches. The setup on this jib isn’t nearly as easy as the EZ FX. Then again it’s a much more complicated jib. But I will give it credit for being much easier to add or subtract length with than most other jibs. I have had issues getting really smooth pans from the head. The cables seem to be facing resistance where they run through tubing. I lubricated the cables, and this decreased the resistance considerably, but for some reason the cable system is still a little noisy. I’m sure this can be worked out. I am going to experiment with other cables and see if I can’t get it silent. But with that said, this jib is amazing in its ability to get creative shots. It is well engineered and constructed, and as soon as I work out a couple bugs, it’ll be great. It doesn’t support the heavier cameras. However, it works great with Z1Us, HVXs, and the Canon XL series cameras, and will even be able to handle the Red Cam with a wider prime lens. That’s all I need right now.
All photos by Jon Firestone.
Jon Firestone is the director of The Short Way In, a television series about independent film and getting into the industry. He co-founded Thomas-Firestone Productions, and developed and taught the 3D graphics program at the Colorado Film School. Jon works as a freelance cinematographer and director in Denver, Colorado.
Related filmmaking guides
Keep learning filmmaking
Want more lessons like this? Join StudentFilmmakers free for live webinars with working pros, and stream on-demand filmmaking classes in cinematography, directing, screenwriting, sound and post.