By Michael Corbett
Every production needs a shooting schedule. Michael Corbett shows how to build one DIY-style, from script breakdown to strips, without fancy software.
Every production needs a shooting schedule. Extra effort to carefully prepare a shooting schedule during pre-production pays off during the shooting phase. There is always something that will happen during shooting that will compel a change in the schedule.
The most common thing that impacts a schedule is the weather. This is why exterior scenes are always scheduled first and interior cover sets are planned. The crew can still shoot on a bad weather day by moving to the interior cover set. Many other unexpected things can happen that force a schedule change: actors or the director can become ill, equipment can break, a location can fall through, the production might get behind or ahead of schedule and need to adjust the remaining shoot days.
For many years schedules were only done by handwriting on small strips of cardboard that were arranged in a special production board to hold them. (Strips and boards are available from http://quixote. com/epA.php starting at $64.95 for boards and $5.50 for bundles of 50 board strips). Using a strip board an Assistant director can quickly rearrange the scene strips as circumstances dictate. This is still done today but the master schedule is usually designed using a software program like Movie Magic Scheduling. Applications like this can print the strips to be placed in the strip board. Programs like this will also print many other very useful reports like one-line schedules, day-out-of-days reports and lists of props, locations, vehicles and other production elements needed. Few people would consider managing a feature film production with out one of these scheduling and budgeting software packages.
But most student productions are short films that do not necessarily require the sophistication of one of these professional production scheduling applications. Many college film programs have one of these applications that you can use to schedule your show but you must use the software package to make changes to your schedule. You cannot easily exchange files with other To download sample of excel file, go to http://www.studentfilmmakers.com/magazine/ref/diy-schedule.xls crewmembers unless they have the same software.
I have used Movie Magic scheduling and budgeting software since it first came on the market. But from time to time, I have worked on smaller productions that could not afford the purchase price of the software, the strips and the strip board. On these productions the $700 to $800 for the scheduling software and strip board materials was much better spent for some other basic need of the production like catering, craft service or more film. On one such production I had an epiphany, why not use Microsoft Excel to design the schedule and print out simple reports to give to the crew?
The beauty of using Excel to schedule your productions is that almost every computer in the world has Microsoft Excel installed. You can create master documents, save them to your thumb drive and make updates anywhere that you have access to a computer. You can easily email files to others for their direct input.
You have to stay focused when using Excel to schedule your production to avoid deleting a scene or an important element. It also requires some manual input like totaling the page count for a shoot day by using the Excel SUM function. This task is automated in the professional applications. After you create a few schedules with Excel it becomes fast and easy. If you are really skilled with the Microsoft Office suite you can create custom forms and reports that rival the ones generated by the professional applications.
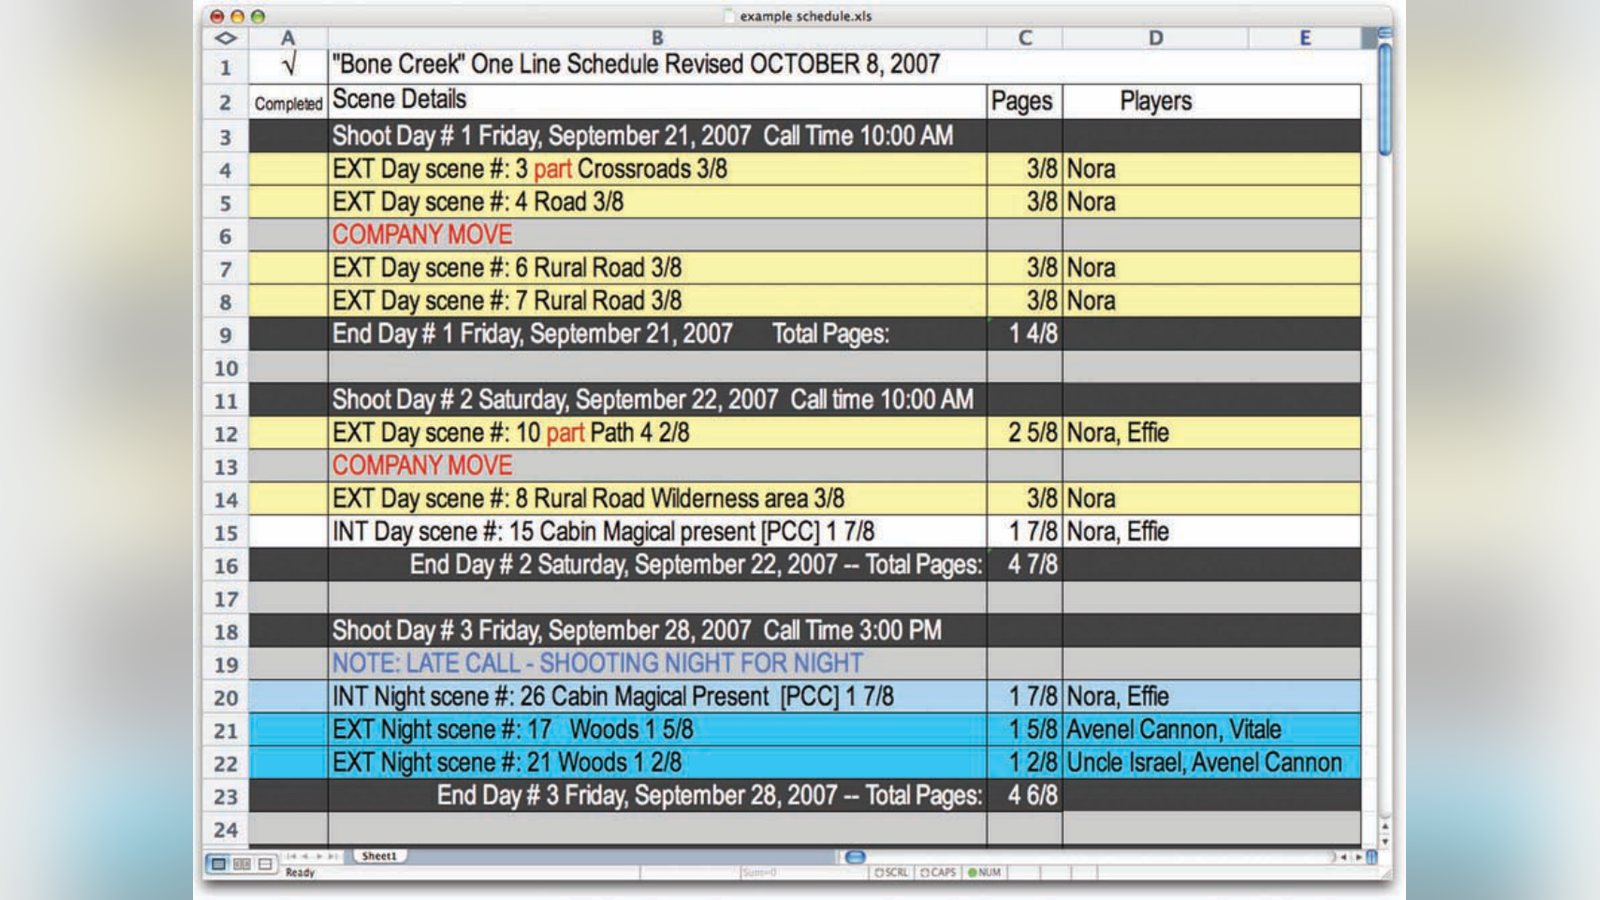
The steps involved in producing your shooting schedule with Microsoft Excel are identical to using the professional applications. You begin by keying in the elements of each scene taken from your break down script: Exterior/Interior, Day/Night, Scene number, brief scene description, story location, page count and cast members required for the scene. You can add more elements like the actual shooting location, special props needed, vehicles etc. if you desire, but I find that the basic list works well. In the extreme left column I leave room to mark the scene completed.
You can get very elaborate by using a single column for each script element. This will give you more options to sort the strips later by selecting categories of elements that directly impact the schedule like: day/ night, interior/exterior, cast members or the shooting location. In the example shown I combined several elements for each scene into a single cell.
On your spreadsheet document use one of the top rows to name the element columns, then use a single row for each strip required. Usually one scene is included on one strip unless it is very long and needs to be broken into parts.
You can color code the strips to make it easy to know if the scene is day or night, interior or exterior.
I use black strips with white text for the day banners. I like to put a gray strip between each day to make days a little easier to read. I also use gray banner strips with red letters to mark special notes like company moves, etc.
One of the options in Excel is to display numbers as fractions. Using this option (found under Format Cells – Number – Fraction – As eighths) you can display the page count in the industry standard of 1/8 pages. You can then use the sum function to add up the total pages for a days shooting schedule (found under Insert – Function – Math & Trig – SUM or click the Auto SUM button in the top menu bar). I put this sum function in the cell directly under the page count entries on the End Of Day banner.
To move strips click in the Row number box to the left of the row with the scene you want to move and cut it (found under Edit – Cut).
Next click in the Row number box to the left of the row where you want to insert the strip. When you insert the strip it will appear above this selected row.
And then under the Insert menu use the Cut Cells option (it inserts the cells you previously Cut). The row with the scene you are moving will be pasted above the row you selected for the insert operation.
To keep the total page count for each shooting day accurate (very important for planning your shoot days) you will need to re-enter the sum function for each day you changed.
For simplicity I have described using the pull down menus to perform the actions, but there are keyboard shortcuts for most of these menu commands that will make this process very fast.
I invite you to drop me an email, and I will send you an example worksheet as an attachment that you can use as a starting template. [email protected]
Keep learning filmmaking
Want more lessons like this? Join StudentFilmmakers free for live webinars with working pros, and stream on-demand filmmaking classes in cinematography, directing, screenwriting, sound and post.